Fitting 35″ Tires on an Ford Econoline with a 5″ Lift by Weldtec
Fitting 35″ Tires on an Econoline with a Weldtec 5″ Lift
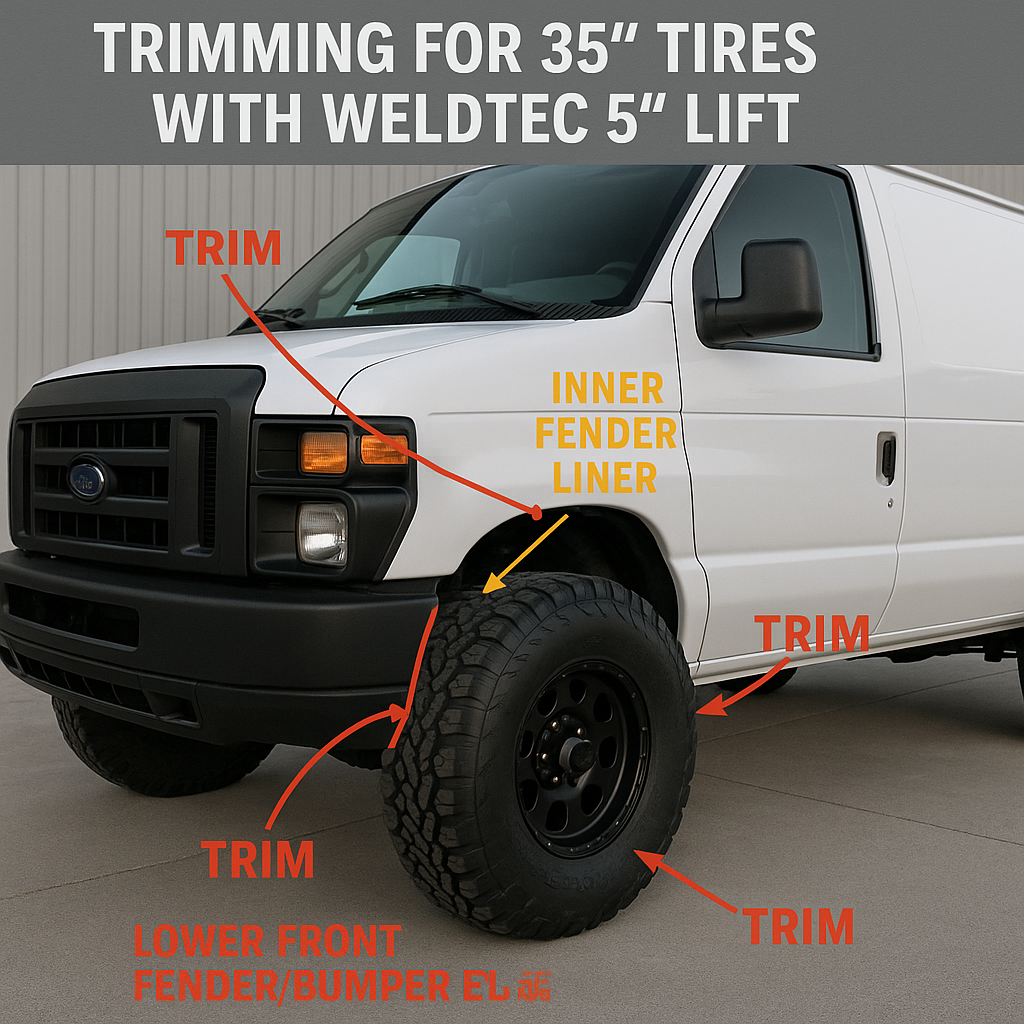
Here’s the catch — 5″ alone isn’t enough for 35s on an E-series without some cutting.
To run 35×12.50s without rubbing:
-
Front wheel arches: Trim lower fender corners and possibly pinch seam near the rear of the front wheel well.
-
Inner fender liners: Relocate or trim to clear at full lock & suspension compression.
-
Bumper: You may need to notch the front bumper edge or push it forward with spacers.
-
Backspacing/offset: Run wheels with ~4.5″ backspacing. Too much offset and you’ll rub the outer fender; too little and you’ll hit radius arms.
-
Steering stops: May need minor adjustment to prevent rubbing on radius arms at full lock.
-
Gearing: Stock gears will feel gutless with 35s — consider 4.10 or 4.56 re-gearing for drivability.
⚠ Pro Tip: Many people go with WeldTec’s 6″ kit for true 35″ tire clearance on Econolines — with the 5″ you can do it, but it’s fender surgery time.
❓ Which country are you in so I can check the local alignment specs, tire laws, and whether 35s will cause any inspection issues?
Trimming for 35s — Econoline E-Series
Front Fenders (Main Rubbing Zone)
-
Lower Rear Fender Corner (just behind the tire)
-
This is where the tread catches at full lock when the suspension compresses.
-
Trim: About 1–1.5″ from the bottom corner, following the wheel arch curve.
-
Pinch Seam:
-
Inside the wheel well, there’s a vertical welded seam.
-
Flatten it with a hammer or cut & fold — otherwise it will slice the tire at flex.
-
-
-
Lower Front Fender / Bumper Edge
-
The lower plastic bumper valance and sometimes the metal bumper lip will hit the tire on turns.
-
Trim: Cut the valance back to match the fender curve, and if needed notch ~½″ off the metal bumper corner.
-
On steel bumpers: round off sharp corners after cutting to avoid stress cracks.
-
Inner Fender Liner
-
Pull it back and mark where the tire touches at lock.
-
Use a heat gun to “push” the plastic inward, or trim away a ½–1″ strip.
-
Re-secure with new screws or clips so it doesn’t flap.
Rear Wheel Wells
-
On the E-250, 35s usually clear in the back with a 5″ lift — but if you’ve got saggy leaf springs, you might hit the leading edge of the rear fender lip under full compression.
-
If so, roll or slightly trim the lip to avoid cutting into the tire.
Steering Clearance
-
Check the inside sidewall clearance to the radius arms at full lock.
-
If it’s rubbing:
-
Either adjust steering stops (you’ll lose a hair of turning radius)
-
Or run wheels with slightly less backspacing.
-
💡 Pro Tip: Mask off the trim area with tape before cutting so you get a clean line. After trimming metal, seal the edge with rustproof primer and touch-up paint — vans love to rust there.